AccountEdge Connect
Using AccountEdge Connect
Time Tracker
You can add a new Activity Slip or Timesheet from the Time Tracker feature in AccountEdge Connect.
Add Activity Slip
Activity Slips allow you to bill your customers for the time your employees or vendor/subcontractors spend performing activities, include this time as an entry on a timesheet or create an invoice.
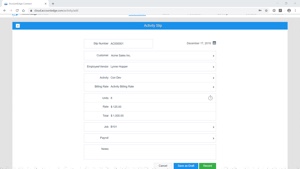
- Click on Time Tracker on the top menu.
- Click on Add Activity Slip.
- Enter your details for the activity slip.
- Customer
- Employee/Vendor
- Activity
- Billing Rate
- Units
NOTE: You can add units of time by manually entering it or starting a timer by clicking on the stopwatch icon.
-
- Job
- Payroll
- Notes
NOTE: List information (activity, rates, jobs, and payroll categories) are synced from AccountEdge Pro. If you need to add a new list item, you can do so on the desktop and then sync with AccountEdge Connect.
- 4. Save the activity slip by hitting Record or Save as Draft to continue working on it later.
Add a Timesheet
Entering a timesheet is a quick way to record time for a customer and an activity over multiple days, without creating individual activity slips.
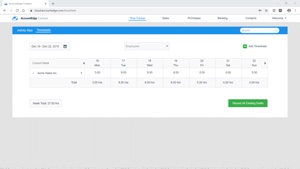
- Select the employee or vendor contact from the employee’s text field. You can type in the name or select from a list.
- Click the Add Timesheet button.
- Enter in the Customer Name.
- Enter the hours worked on the correct days.
- Select your Activity.
- Select a Payroll Category and Job if needed.
- You can save the timesheet as a draft for future editing or select Record.
Tracking Time for Payroll
AccountEdge Connect has time tracking ability for billing purposes, but you can use that to track employees’ payroll time as well. There is a workaround to record time for payroll purposes but not use it for customer billing. This is for users that bill for their time in AccountEdge and would like to use that tracked time for payroll processing. You will track the payroll time as if it was a billable service.
To get started using timesheets for payroll, you need to set your preference in AccountEdge Pro.
Set Your Preferences
In AccountEdge Pro:

- Go to Setup on the top menu bar.
- Select Preferences.
- In the System tab, make sure that ‘I use Timesheets for….’ is checked.
- From the drop-down, choose Time Billing and Payroll.
- Select what day you want your week to start.
- Click OK.
Create a New Activity

- Go to the Time Billing Command Center, select Activities List.
- Click the New button.
- Enter the following information:
- Activity ID: Payroll Time
- Activity Name: Payroll Time
- Type: Hourly
- Status: Chargeable
- Rate: Use Activity Rate
- Select the revenue (4-xxxx) account to post this revenue to your chart of accounts when this activity is used on an invoice.
- Set the Default Activity Rate to $0.00.
- Click OK.
Create Payroll Customer
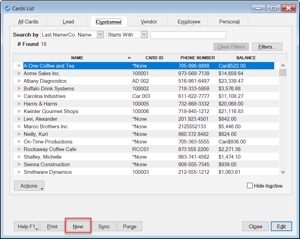
Because entering a timesheet requires a customer in AccountEdge Connect, you can create a dummy customer record.
- Go to the Card File Command Center in AccountEdge Pro, select Card List.
- Select New to add a new contact.
- In the name field, add Payroll Time.
- Click OK.
- Sync with AccountEdge Connect to show the latest changes when you log in.
NOTE: This will not affect your billable transactions
Turn on Payroll Category for Employee
In AccountEdge Connect, click Welcome at the top right corner of the page, then select Settings from the drop-down.
Make sure the Payroll Category is set to On for each employee.

Enter Timesheet
- Go to Time Tracker in AccountEdge Connect.
- Choose Employee name.
- Click Add Timesheet.
- Select the Payroll Time Customer.
- Select the Activity Payroll Time.
- In Add Payroll – choose the payroll wage.
NOTE: This is pulled from AccountEdge Pro on the employee’s contact record under Payroll Details.
- 7. Enter in the time for each day.
- 8. You can save as a draft to continue adding time during the week or hit record to submit it now.
NOTE: each day that has time entered will create an individual activity slip in AccountEdge.
The recorded timesheets will be available when you go to Process Payroll in AccountEdge Pro.
Sales
You can add a new sales invoice, order, or quote and accept customer payments for open accounts receivable invoices created in AccountEdge Pro or AccountEdge Connect.
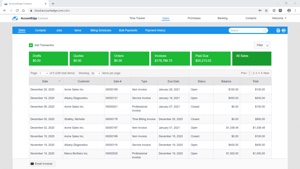
You can easily filter your sales transactions by selecting any one of the following green tiles at the top of the page:
- Drafts
- Quotes
- Orders
- Invoices
- Past Due
- All Sales
You can also filter your sales transactions by clicking the Filter drop-down. You can filter your results by:
- Customer
- Date Range
- Transaction Status
- Transaction Type
Add a Sales Transaction
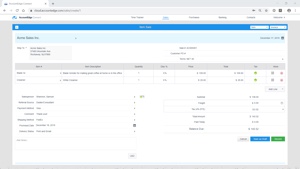
- Click Add Transaction.
- Select the type of sale you would like to create (Invoice, Order, Quote, or Credit Memo) from the drop-down.
- You can select the transaction layout (Item, Service, Time Billing, Professional, or Miscellaneous) from the blue menu bar drop-down at the top of the page.
- Enter your customer information and fill in the new sale information as needed.
- Select Save as Draft or Record.
Accept Payment
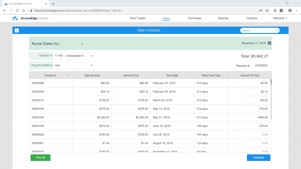
- Click Add Transaction.
- Select Add Payment from the drop-down.
- Enter your customer information. This will show you a list of all open sales transactions for this customer.
- Select the correct Payment Method.
- Click the open field in the Amount to Pay column next to the invoice your customer submitted payment for. You can edit the amount in the field if the customer has only submitted a partial payment.
- Click Continue when finished allocating payment funds to the available invoices.
- Enter the payment details.
- Click Apply Payment.
Purchases
You can add a new purchase bill, order, or quote; and accept and apply payments for an open vendor invoice from the Purchases feature in AccountEdge Connect.
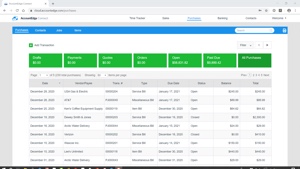
You can easily filter your purchases transactions by selecting any one of the following green tiles at the top of the page:
- Drafts
- Payments
- Quotes
- Orders
- Open
- Past Due
- All Purchases
You can also filter your purchases transactions by clicking the Filter drop-down. You can filter your results by:
- Contact
- Date Range
- Transaction Status
- Transaction Type
Add a Purchases Transaction

- Click Add Transaction.
- Select the type of transaction you would like to create (Bill, Order, or Quote) from the drop-down.
- You can select the type of purchase layout (Item, Service, Professional, or Miscellaneous) from the blue menu bar drop-down at the top of the page.
- Enter your contact information and fill in the new purchase information as needed.
- Select Save as Draft or Record.
Bill Payment
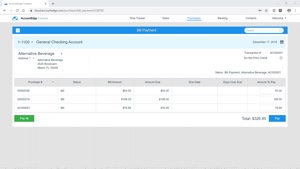
- Click Add Transaction.
- Select Bill Payment from the drop-down.
- Enter in your vendor information. This will show you a list of all open purchase transactions for this vendor.
- Click the open field in the Amount to Pay column next to the purchase you want to apply the payment to. You can edit the amount in the field if you are submitting a partial payment.
- Click Pay when finished allocating payment funds to the available purchases.
- You will now be able to print a check from AccountEdge Pro.
Record Basic Expenses
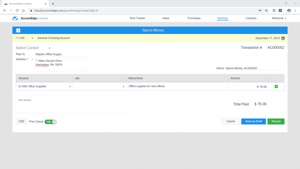
- Click Add Transaction.
- Select Spend Money from the drop-down.
- Enter in your contact information, expense account, and amount.
- Select Save as Draft or Record.
Banking
Displays any payments made or received created in AccountEdge Connect.
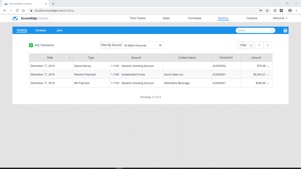
You can filter the list by bank or credit card account, transaction type, and date.
Transactions:
- Spend Money – Record a basic expense transaction
- Receive Money – Record a basic income transaction
- Receive Payment – Record payment from a customer for an open invoice
- Pay Bills – Record payment to a vendor for an open purchase
For Receive Payment and Pay Bills transactions, when you select the customer or vendor, you will see all the open sales invoices and purchase orders. You can allocate which transactions the funds should be assigned to.
NOTE: In the Banking feature, you will only see the transactions that were created in AccountEdge Connect, you will not see transactions created in AccountEdge Pro.
Contacts
You can view, edit information, add new contacts, and send emails in AccountEdge Connect.
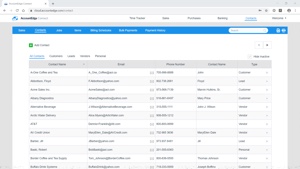
From the view contact window you can:
- View and edit contact information
- See overdue balances
- Set custom list and custom fields
- View lead/customer status
- Set selling or buying details
- Manage jobs
- View transaction history
- Set default payment methods
Items
You can view your list of items from the Sales or Purchases feature in AccountEdge Connect.
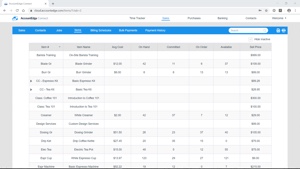
You will be able to see:
- Item Number
- Item Name
- Average Cost
- Quantity On Hand
- Quantity Committed
- Quantity on Order
- Quantity Available
- Selling Price
Jobs
You can add, edit, or view your list of jobs from the Sales, Purchases, or Banking feature in AccountEdge Connect.
You will be able to see a list of available jobs as well as add a new one when needed.
Create a New Job
- Click Add Job.
- Select if it is a Header or Detail Job and fill in the information as needed.
- Click Save.